Dear Everyone, I can’t believe it. I am due next week. That’s blowing my feeble mind.
Speaking of the Bower spawn….I thought in the spirit of Father’s Day (see how this ties in?! father’s day? spawn? youngins? reproduction?) that I would share with you Jeremy’s Easter basket….yes, a few months late….because I’m super prompt like that and also it would also make a great gift for those Daddy’s who love tools, fitness and junk food.
Basically, we had our neighbor Larry come help us with the basement and Jeremy was all like “hey there, nice box” and Larry was like “thanks, I use it all the time.” and then they stared at the box together. It was the topic of discussion FOR WEEKS. Jeremy made it very apparent that he wanted a box. It was like when girls get on Instagram and they see all the photos of peonies and are all like WHY AM I LIVING A PEONY-LESS LIFE!? MUST GO TO TRADER JOES NOW. That was Jeremy….except the box was his version of ruffly flowers and there was no Instagram. So that started the ‘easter-box’ idea. I got the box at the home improvement store and decided to fill all the compartments with things he requested or needed for the last few months. He has since asked for another box.
I mock him online….he mocks me like this….
That is what happens when I say “what do you mean, I am posing?!”…Thanks hon.
Here are the links if you want to purchase on Amazon….
2. Nike Metcon 1….Jeremy says that “these are the most comfortable CrossFit shoes he owns” which is saying something because he owns like five pairs and he has only been doing CrossFit for a little over a year.
3. Ryobi Phone Works Stud Sensor….it hooks up to your smartphone and is ridiculously high-tech. It’s basically the stud finder love child of James Bond, Bill Gates, and Mike Holmes. Let’s throw Taylor Swift in there too since she really likes her phone.
4. DEWALT Screwdriver Set….we break our screwdriver tips all the time….I guess my muscles are too strong for metal
5. CLIF Protein Bar ….Jeremy likes this kind because they don’t taste nasty and they have the most protein. I think KitKat’s taste better.
6. Krave Chili Lime Beef Jerky ….we are beef jerky people and I decided to switch things up and give him some crazy flavors. This one was different but completely addicting.
Next on the agenda….our baby pool! Not the one with the swim diapers and the tons of floating grass….the one where you get to guess what/when Baby Bower #4 is going to be born! We did it with both LJ and Weston and it was so exciting to see all the participants guess the weight, length, date, eye color, etc. It’s a fun way you get to be part of this baby’s birth and at the end, we plug in the correct info and see who is the winner! That person gets a super fun little package from us because they are awesome at guessing games.
In full disclosure (and because I know there are analytical people out there that need ALL the details to make an educated hypothesis), my due date is set for the 13th of June and I have had babies born 7 days late, 13 days late and 15 days late. Will was 9 lbs 11 oz, Weston was 10 lbs 3 oz and LJ was 9 lbs 14 oz. Will was born with dark brown hair, brown eyes. Weston had blonde hair and blue eyes and LJ had brown hair and blue eyes. We already know that this baby is a BOY….and we have checked at every appointment so please don’t get that one wrong
And while we are on that baby train….I do plan on Instagramming the birth again. I know that it’s a little TMI for some people (EWW FLUID!) but they are photos that I really love and honestly, it’s a way for us to instantly inform family and friends of our little arrival and their journey from the center of the earth-shaped-belly. If you would like to follow along, I am @bowerpowerblog and I promise there will be no vagina shots….probably.
Last little update….the boys and their trees!
Every time we have a baby, we plant a birthday tree. We are not the kinda people that rush home and must plant it on their actual birthday….but we do try to put it in the ground at some point and then we call it “Will’s tree”, etc. We also try to do pictures with the tree every year. Some pictures are missing (they are on my hard drive but I just say they are missing because I don’t want to sift through the millions to find them right now). Here is this year’s birthday trees….
Yes, Weston is a ham with the muscles.
Will’s tree is doing awesome. We had transplanted it from our first home and we thought it might die at first but last year it started perking up more and this year the blooms were out of control. I love it.
Weston’s tree survived and that was a huge surprise for me because I didn’t know if it would. It’s a peach tree and it’s with our other blueberry bushes and veggie gardens (we didn’t plant a true garden this year but my rosemary lives in the garden beds). It did bloom and I love that he knows that it is his tree….he is very proud of it
LJ’s tree didn’t make it. We all mourned. That means this fall we have to dig it up and replace it….but that’s okay because that is when we plan on doing Baby #4’s tree and it’ll still be 2015.
OH OH OH…..we are working on a big project next week and I can NOT wait to share all the details. I am literally dying inside. It’s like a squirrel is clawing to get out of me but that rodent is actually all the details and it’s gonna be SO FUN when I finally do get clearance to share it all. Since we will be crazy busy, I have posts planned for next week and your comments will probably sit in moderation (consider yourself warned…I’m not MIA because of the baby….). Those posts will have a bunch of fun projects for your home that I am sure you will love! Happy Hump Day!
The floating shelves in the laundry room are now 100% done. And with these crossed off the list, I can finally start using them—which also means that I can finally make the cluttered floor of “Mount Washmore” a thing of the past and gain some extra storage.
Here’s the thing with these shelves: I’ve been contemplating them for a while. Because despite the many tutorials I’ve looked through, I’ve never been able to find the exact combination of features I was looking for. Specifically:
Long. Deep. Thin. Inexpensive. Secure. I spent a while looking, but I honestly had a hard time finding one that had all of these in one. My biggest issue was that most floating shelves require the frame of the shelving system to be rather thick if they’re going to be as long as I needed mine to be. And I may be alone in this, but I do. not. like. “chunky” floating shelves. For me, certain things are meant to be chunky—like a baby’s legs and cookie dough ice cream. And some things just aren’t—like peanut butter, Leonardo DiCaprio (sorry #dadbod fans), and my floating shelves.
I get that it’s a combination of personal taste and function. A certain thickness is to be understood for the sake of getting a long, wide shelf to be sturdy enough to last with a reasonable amount of weight on it (and without bowing in the middle over time). The inner structure has to bear the weight, and shelf thickness is often just a byproduct of that. Or some people just like them that way, and that’s good too. But considering that my laundry room space is really, really tight (and awkwardly shaped), I simply didn’t like the idea of thick, chunky shelves taking up the view. What wasn’t so simple is figuring out how to make something thin support a lot of weight…like chicken legs on bodybuilder. So, I worked on the idea for a bit and combined tutorial ideas that I spied on Pinterest until I came up with something that worked for me. And a lot better than the whole bodybuilder thing.
So let’s get on with the tutorial, shall we? (Note: some links contain affiliates.)
Lumber:
1x2s (frame & front shelf piece)
1x3s or similar 1x scrap wood (frame)
1/2″ sanded plywood (for the top of each shelf)
5mm sanded plywood (for the bottom of each shelf; decorative purposes only)
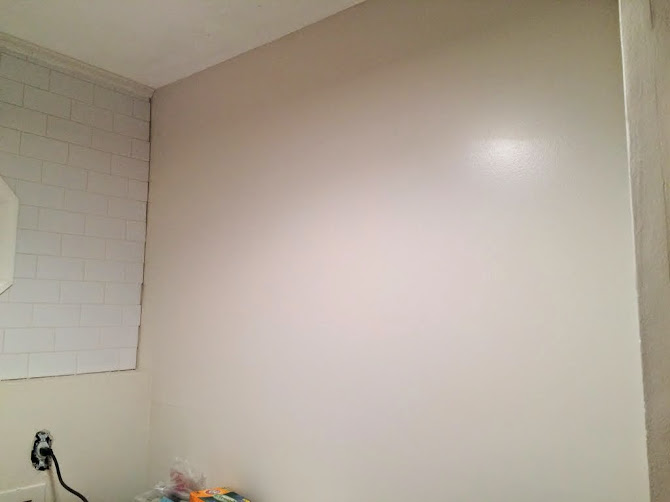
My shelves were surrounded on three sides by walls; the entire tutorial is pretty much contingent upon that fact alone, so if you are trying to secure these on a wall that isn’t at least surrounded on two sides with studs or a place to put anchors, you may have support issues.
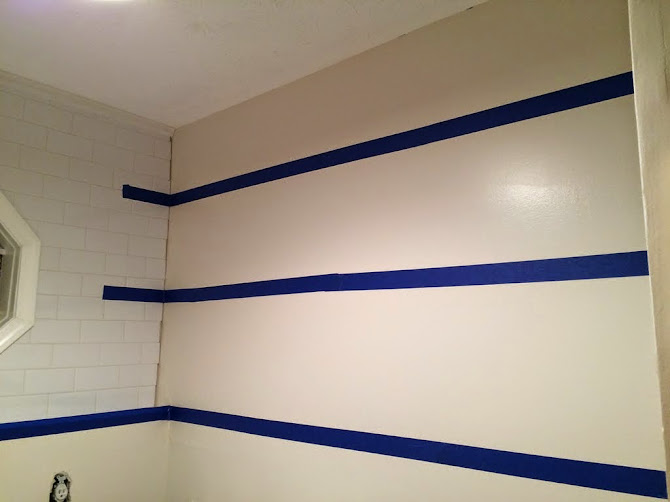
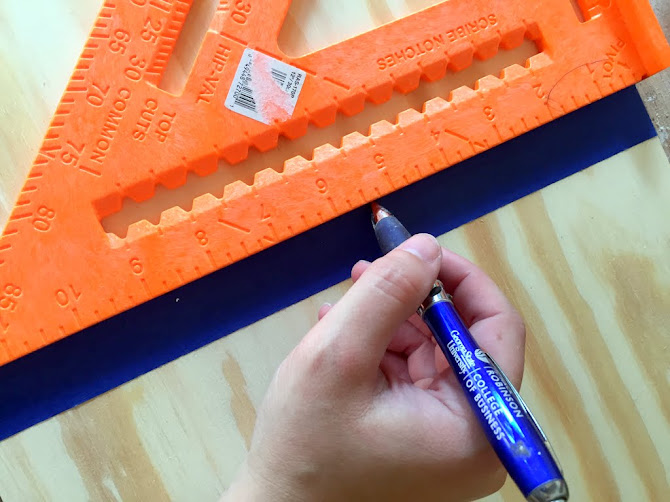
To begin, mark the spot for your shelves along the wall. Using painter’s tape will help you visualize each shelf for placement and spacing. Remove the tape, then use a level to mark a pencil line along the entire wall to use as your level edge for adding the support (basically, you’re going to match the straight edge of the top of your support with this line).
Shelf measurements
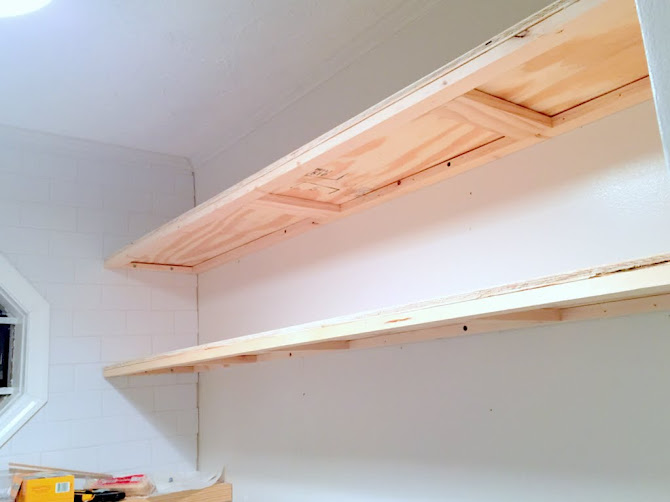
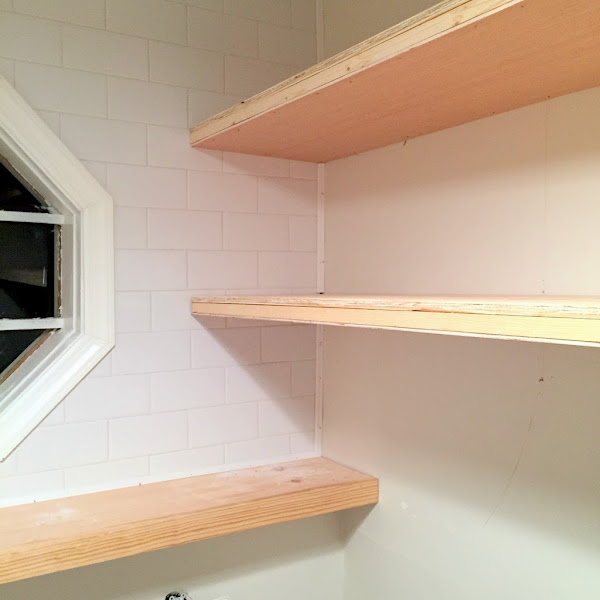
Each of my shelves (on the right side of the picture above) were approximately 69 inches long and 12 inches deep (I know, it sounds like the setup for a joke, but it’s true). The best part though is that the thickness of each shelf is only 1.5″, and still super sturdy!!!
By using a 1×2 on its thin side, I was able to keep the shelf thin but still provide a supporting structure. It’s also the reason why I created a full 4-sided frame rather than just installing the cleats and middle supports through the shelf; other floating shelf tutorials do not include the 4th piece in the front, which makes sense to me, but I found that it really came in handy for keeping the middle pieces secure, level, and ultimately supporting the plywood on top.
1. Create the frame
The frame is pretty easy to make; I used 1x2s for the sides of each shelf, cut to length for the back and front pieces (so 69″ or 5’9″ long) and width for the sides, minus the width of the front and back pieces (I wanted 12″ wide shelves, but the actual width of 1x2s are 1 1/2″ wide, so that meant only 9″ for the side pieces). I experimented a little with the inner pieces of each shelf though, first trying 1x2s on the lower shelf and some scrap pieces of 1x3s on the top shelf (so you’ll see some differences in each shelf’s structure in my pictures). I found the 1x3s to provide a much sturdier frame when using in combination with the Kreg Jig, so I’m recommending that you use this structure as well. I’m still very much a beginner with Google Sketchup (having done only one other post ages ago with it), so hopefully this makes sense!
And just because I’m new to SketchUp, I thought I’d give you a color-coded version as well. Blue and white are 1x2s (9″ and 69″ long, respectively) and the green is 1×3 (9″ long).
The holes for all of the Kreg’d pieces were done before installing on the wall, but I wound up taking the side cleats off for the next few steps before putting it back together (I still recommend doing this since it makes screwing things back together much easier).
About the side cleats
For beginners, you might not be familiar with the term “cleats” – but these are usually the pieces that screw into the wall and help support/distribute the weight. I’m also a DIYer who uses whatever convenient term that pops into my mind, so cleats, frame, supports, etc. all share a similar meaning for me in this project. Essentially, what I’m doing here is turning these cleats into more of a frame so that there are other parts that also help support weight, but it all relies on how securely these first few pieces are installed. You’ll want to make sure these are nice and secure by either screwing them into studs or using wall anchors on all three sides that attach to the walls. I first began by installing these pieces on each side—the tile wall first (since it would be the least forgiving), and then the opposite wall using wall anchors. Be sure to leave a gap along the back wall for the back piece of the frame to fit in snugly (1 1/2″).
This needed a tutorial of its own, so you can find that here.
3. Add the middle supports to the back cleat
With the longer pieces of each shelf cut to 69″ each, I used some remaining scrap 1x2s and 1x3s to fill in the middle section of the first shelf. I drilled pocket holes using my Kreg Jig and 1 1/4″ screws (determined based on the thickness of the wood, which is 3/4″). Use wood glue too (but only once you’re sure of how things will be installed; I had some trial and error figuring out each step, so I’m glad I waited to use wood glue!). As I mentioned above, I found after installing the first shelf that I liked the 1x3s for middle support better, so I recommend using them as you can see in the diagrams above.
Tip: Face clamps are your best friend; if you have a Kreg Jig, I highly recommend using their face clamp for projects!
I wound up not having enough scrap 1×3 laying around for both shelves, but I found that even with only 2 supports in the middle (I eyeballed the spacing), it was still very solid.
4. Add the frame to the wall
With the side cleats installed (remember to leave a gap to fit the back piece), screw in the back cleat and rest of the frame to studs in the wall. The front piece can either be screwed into the middle supports already or put on last; I wound up trying both ways and didn’t find that there was a significant difference (either way, the whole thing was still somewhat cumbersome to install by myself because of the length).
Tip: A brad nailer is a great substitute for a helping hand; it allows you to temporarily tack up the shelf support and get things level before screwing everything into the studs.
5. Add plywood
With the frame in place, you can then add plywood. Since I don’t have a table saw in my garage right now, I had my local Blue cut down a piece of 1/2″ sanded plywood and 5mm sanded plywood to 12″ lengths for me. The rest of the cuts I did at home using my circular saw and a piece of scrap wood clamped to the plywood to use as a guide.
Tip: Use painter’s tape to help keep a clean edge when cutting plywood.
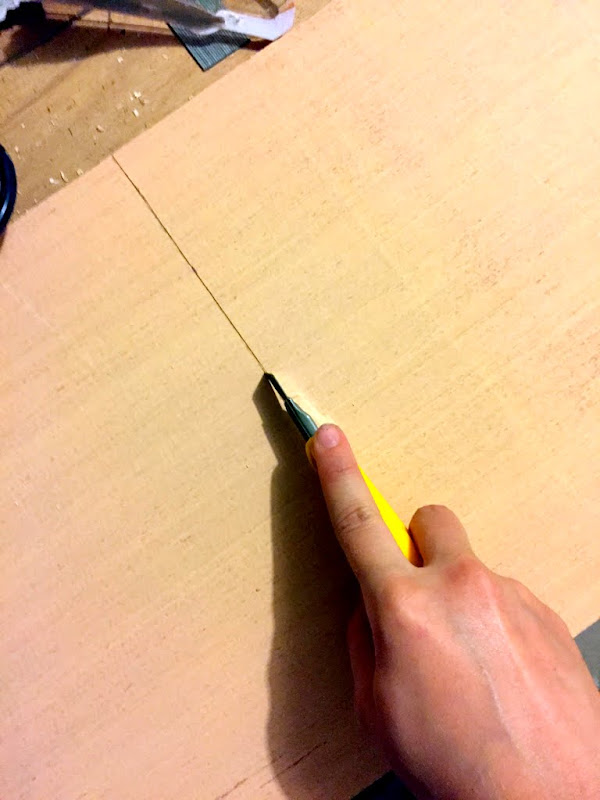
For the underside piece of plywood (the thin 5mm stuff), I was able to cut it down with a utility knife quite easily (sidenote: Olfa** sent me several of their utility knives to try out this summer, and I’ve found that I prefer this utility knife to the rest. It’s my new go-to tool—great for small molding projects, and I’ve found that it’s been the leading reason why there are no more cardboard boxes in this house anymore*).
I attached the top piece of plywood with wood glue and my brad nailer. The bottom piece needed some clamping before it stayed up, so I used a few brad nails strategically to hold things in place toward the back and clamped the front while the glue dried.
6. Attach the front piece
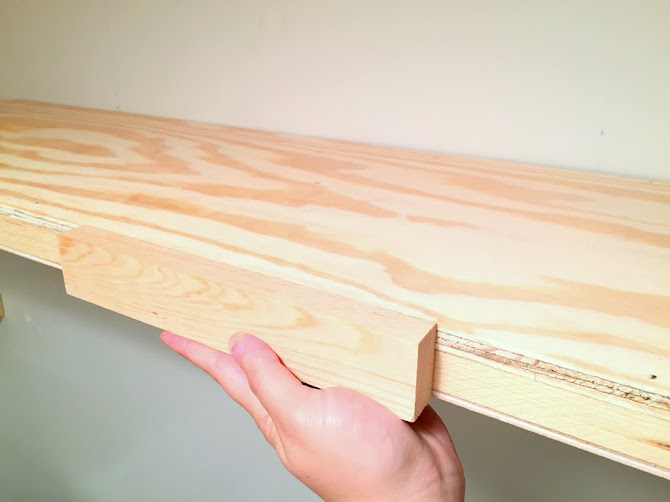
When all pieces are attached, they wound up being just shy of 1 1/2″ thick, so I was able to use another 1×2 for the front to hide the plywood edges.
7. Finish and decorate!
After all of the finishing steps (filling holes with wood filler, sanding, caulking, priming, painting, etc.), here’s how things look now:
You can also see two other updates in these pictures: one, I added the rest of the trim around the tile to complete the back wall too (which looks a LOT better than before!); and two, I have begun RE-painting the walls. That makes this the third color I’ve put on them since moving in, and worth a serious eyeroll for taking so many tries to find what works, but I’ve known for a while that the color I’ve been using in the rest of the house simply wasn’t working with the lighting in this room. I tried to hold out as long as possible to see if I could live with it. But once I started painting the shelves, I figured now was the time to see if a leftover gallon of white paint I had from my office would fit—and it did! I’m now convinced that my search for the right color in this room is over. I’ll have more on that when it’s all finished.
And for those wondering, the baskets I’ve added to the room are from Ikea and are VERY old, but they seem to work well in here. The white container on the right is an old kitchen container from Goodwill that I snagged last weeked (maybe a cookie jar?). It now holds my ugly detergent pods, which are nice to have hidden.
Looks like I may need to paint the ceiling, too.
So, that’s it for now. I still have to do some trim work, paint things, and have a decorative project in the works for this room, which I’m hoping to finish up later this evening. I’m loving the way it’s turning out, so it may be the right project to work on while the forecast is predicting rain for the week. More on that soon, and you can catch sneak peeks on Instagram if interested.
———————————————
*I have honestly been addicted to cutting up cardboard boxes lately because this knife cuts so well. Is that weird? That’s weird, I bet. But it’s also strangely satisfying, and my garden bed needed a lot of cardboard to help kill off the grass before laying down mulch, so this odd little obsession worked out great (it’s still mostly just the pure fun of cutting through each box like a tiny samurai sword, though).
**Full disclosure: As I mentioned above, Olfa sent me a package of products to try out and asked me to share those thoughts on the blog once I’d tried them. But, as always, all thoughts and opinions expressed on this blog are 100% my own, and I never share something unless I really do like it.
This is a sort of reveal. It’s nothing fancy. It’s not designery. It’s not Pinteresty. Don’t get all excited. It’s a real life tucked-away-in-the-basement-laundry area. It’s a duck.
The thing is…I am super glad we have it available for our basement dwellers (that makes it sound like they are hobbits but in reality, they are just friends that needed a place to stay while they were in a transition) and it started off as a storage area so having laundry hook ups are a great thing. Nobody wants to share my upstairs half-finished laundry room….trust. me.
So the space started off as just a place we threw a bunch of randoms.
Back in January we found out they were moving in and we did an entire basement clean out. It was crazy and disgusting and awesome.
We decided that we did still need some storage down there and we divided the basement walkway area in half….part for our holiday and emergency storage….part for our guests to use and to put in a laundry nook. I painted the concrete floor to make it a little nicer and then we put up a ‘pallet wall’ to divide this walkway. Since it has doors on both ends, it works to have it as separate spaces.
Last time you saw it, it looked like this….this would be the home of the future laundry nook.
And now it looks like this….
When we did all the plumbing and electrical stuff, we made sure that we could fit in a washer and dryer right here and have it ready for our current and any future guests. These are our friends washer and dryer but we do think that we will keep our eyes peeled for inexpensive appliances for this area….to be perfectly honest, I wouldn’t mind having two sets!
Honestly, I wish we had the resources (time, money, energy, babysitters, etc.) to finish this space to the nines but in reality, that is just not the goal of a get-it-done project like this. I had to limit myself to know exactly what we could put in and how quickly it could happen. The clean out and the floor and the hookups were obviously the most important elements just so that our friends could immediately start laundry when they moved in. The rest was more ‘wants’ than ‘needs’.
I did come up with a basic list of things that could make any laundry area more comfortable….here’s what I put on that list….a small rug, some hooks, and a shelf or cabinet. This old rug has been in my storage pile for a couple years (it’s from Home Goods) and I threw it down.
The cabinetry is REALLY old…it’s from Ikea and we bought it probably six years ago at a heavy discount (funny because we originally bought it when we lived in our old house for our basement laundry area and we never even installed it!). Since it’s their discontinued Akurum line, we crossed our fingers when we headed to Ikea to buy the hanging rail (thankfully they do still sell those!) and for $5 we installed both ‘boxes’ really quickly.
This kinda storage is great because then it frees up the top of the washer and dryer to be a folding area.
If I did one more thing, it would be finish that back wall….maybe one day if I find a good gallon of oops paint I will give it a coat or two. Maybe I’ll wait to have this baby first
The hooks I added were actually curtain tie-backs. I found them years ago at the Pottery Barn outlet (they are West Elm brand) and they were discounted to three dollars each. I think they are perfect for things that need a hanger and they are slightly deeper than a normal hook so they can hold a little more.
So that is our little basement laundry nook. Not super fancy but functional and for a secondary utility area…totally meets the needs. Who knows…maybe one day I will just make this the boys laundry area and they can do their own stinky socks and underwear and dirt ridden uniforms! That would be smart, right?!
Oh and because I know that some folks will ask this….with any dryer, you need a vent, right?! So I will share tomorrow how we vented this interior dryer and how it was super simple!
My hydrangeas are back, and they’re basically the prettiest things I own. Even prettier than Charlie, but that’s because she jumped my fence this morning and I’m mad at her, so she looks like trouble to me instead (kind of like when she climbed on my roof).
All of the pine straw seems to be working its magic on making all of them bluer than last year’s blooms (which I still loved), but I couldn’t be happier. Green ones are my favorite color of hydrangea, but I haven’t tried planting any of those yet. The blue ones still kick ass, though:
Also, little known fact: if you post a picture of blue hydrangeas, purple hydrangeas, or pink hydrangeas on Instagram, people will immediately tell you how to make them not that color. Add sulfur! Add egg shells! Add coffee grounds! Add your toenail clippings! Ok, that last one was fake and also gross, but you get the point. It’s kind of like everyone telling you why you’re so sleepy on Thanksgiving, but instead of there being one reason you’re in a food coma, there are six different ways to get there.
I think at this point, I am 110% covered on how to bring out a certain color on hydrangeas, but what I haven’t tried yet is propagating them. I intend to do that next (because who wouldn’t want even more pictures to share of more hydrangeas and get even more advice about how to make them blue?), so I’m still taking advice on that front. Especially after my history of killing anything that grows from a seedling.
There are other flowers blooming all over my yard, so there is a lot of color going on everywhere.
Ahem… not a lot of weeding going on, though.
But, for this weekend, I think I’ll just stare a little longer at these beauties and remind myself what past work on this backyard as blossomed into; maybe that will get me to finish the beds faster!
P.S. I meant to have the floating shelves play-by-play in the laundry room ready this week, but they wound up needing another coat before I could be done… and I suck at Google Sketchup. So, next week it is.