Aww that’s my little Will….a throwback to a fun fourth in 2012! Isn’t he just the cutest?! **tears**
Back to this post….It’s totally patriotic to be super cheap. I think that is the motto of like every single American. I know it is for that Miley Cyrus. She saves all her nickels and dimes and Miley money to wear with her gold marijuana necklace. Drugs aren’t cool kids. But being patriotic is. As are wreaths.
My transitions to the points of posts are just the bomb aren’t they?!
Sorry mom for scarring your eyes.
So anyhoo…I have a ton of old grapevine wreaths and I thought it would be fun to make a new set of fourth of July wreaths that I could use for Memorial Day all the way till the fourth. I didn’t want to spend a lot of money (fake flowers fade pretty quickly outside in the hot GA sun) and I didn’t want to trek anywhere fancy….like Michaels which is a solid twenty five minute drive with no traffic and hitting no lights….so I just hit up the local Dollar Tree and let Will pick out some red, white and blue faux blooms. I also got some ribbon from Walmart. I spent a total of $6 per wreath so I think that’s a good deal for my final result.
These are super simple…just make a bow and then start alternating colored flowers. The stems are obviously separated from one another and then just wedged into the wreath.
These are so simple that literally you could be completely void of any creative skills and still make one that looks good.
Here’s a little time lapse video of me making them so you can see the process in fast motion…
I had to make two because I have two front doors so I made them so they would be balanced to one another. To hang them I just create a loop outta contrasting ribbon and then tape the ends on the other side of the door.
I love the way they look. I betcha Miley would too
The boys helped me use the rest of the flowers and the flags to create these little boxes for the end of the steps. I think I got the star boxes at Goodwill and I just put flowers foam in them with a piece of red foam paper in front to cover the hole. All the flowers and the flags just got stuck in the foam.
So that’s what I did for the fourth….what kinda decor are you whipping up!? I wanna see! If you posted something on your blog…give me the link in the comments and so I can check it out!
And I sincerely hope that you do in fact have a wonderful holiday weekend. Be safe and enjoy those sprinklers, parades, and barbecues! And if you are a military family who is missing a loved one this holiday….know that we are thinking of you and we appreciate your sacrifice for this great nation! Happy fourth!
This review & giveaway is sponsored by Homewerks Worldwide. All opinions are, for better or worse, 100% my own.
Putting you guys on notice right away: if you play music often or sing in the shower like I do, you’re going to want this bath fan.
Yeah, I see your raised eyebrow. A bath fan? But hear me out.
When Homewerks first suggested trying out their Bluetooth Bath Fan with LED light and Speakers, I wasn’t quite sure I’d like it. It looked kind of difficult to install (spoiler: it was). It required getting up into my attic in the middle of the summer (spoiler: Georgia heat is hot). I don’t add a lot of smart home products to this house, mostly because I would rarely recoup the cost (this house is in an older neighborhood and just not at a price point where I think upgrades are necessary). But the overall verdict? This one was totally WORTH IT. Despite the frustration of installing it — and there definitely was some — this thing has been used every day since I put it in. I’ve been texting friends about it. I whined and moaned during, but I like it that much. Just like laser hair removal.
I suppose I should preface this whole thing by reminding some of you longtime readers (or admitting to you new readers for the first time) that I’m one of those weirdos who sings a lot. It’s not that I have a great voice (friends insist it’s ok, but I still feel like I need to apologize)… I just like singing. I find it relaxing. It puts me in a good mood. It motivates me when I work out. If the TV isn’t on in the background, one of my many Spotify playlists is. I also sing while I paint or work on projects, and I frequently refer to myself doing “car-aoke” when I go on long drives (Atlanta is a driving city, so being in the car for extended periods of time is common). In other less rambling words, music is just part of my daily routine. I suppose it’s a good thing that Charlie doesn’t seem to mind my warbling along.
Naturally, I also sing in the shower. Loudly. Prior to installing this fan, I have usually just put my phone on its loudest volume setting, placed it in the sink for some added acoustics (see here for why), and hopped right into the shower. While that was a perfectly nice solution, it wasn’t really ideal, and the shower still drowned out most of the sound. So when this fan arrived in my mail a few weeks ago, the plan was to try it out as a new upgrade in my master bath and see if that helped motivate me to get the rest of the room done. After all, I still have a vanity and toilet taking up room in my newly upgraded garage.
Unfortunately, the placement of my exhaust fan in the master bathroom wasn’t really working to get this new fan installed. This new fan includes an LED light, which is much larger than the existing vent cover, and much too close to the wall to fit. The solution would have either been to move the entire exhaust fan over toward the middle of the bathroom ceiling (and move the electrical, of course) or try the fan out in the guest bath that had better placement… which has also had a lot of work completed already.
No surprise here: guest bath it is! I started by removing the old fan… which I quickly learned was a huge pain in the butt when it requires crawling through insulation… in my attic… in June… in Georgia. The roof pitch made this whole process a little more uncomfortable since I only had about a foot of workable space above it (and nails coming through the plywood above). But, with a few choice words, the old fan came out and I expanded the hole for the new one.
Unlike the existing fan that sat flush with the ceiling joists, the new fan would hang slightly lower to be flush with the ceiling’s drywall. I wish I had some pics in the attic, but with the heat making me cranky and the power turned off to hook this thing up, photos weren’t really a priority. I do, however, have this photo I took below so you guys can see how to make things a little easier. I used a leftover piece of cedar from the garden bed project to provide a means of temporarily sitting the fan flush with the drywall while I tried to install things above. File this under “things you learn when doing projects solo” (here’s another!).
It was about this point is where I realized that the new fan would require fishing new wiring to handle the light, the fan, and the new data connection of the Bluetooth setup going down to the wall switch. The neutral/hot/ground wires were easy enough thanks to some quick-connect ports that came with the fan (love those things), but the Bluetooth connection would require more work. The install instructions don’t really say much about this beforehand — just a quick blurb about connecting the “data connection” wires together, which don’t actually exist unless you knew to fish them through ahead of time.
Combining that with my increased snottiness of trying to figure this out in a hot attic in the dark, I threw in the towel and called in for some professional help. In truth, if you’ve got experience with electrical, this would be an intermediate (or advanced intermediate) DIY project, but I would highly recommend hiring a pro for the majority of DIYers. In the fall. I don’t like hiring pros for most things when I know I could eventually figure it out (I’m stubborn), but risking heat stroke because I’ve had to find missing pieces of the instructions is not really wise.
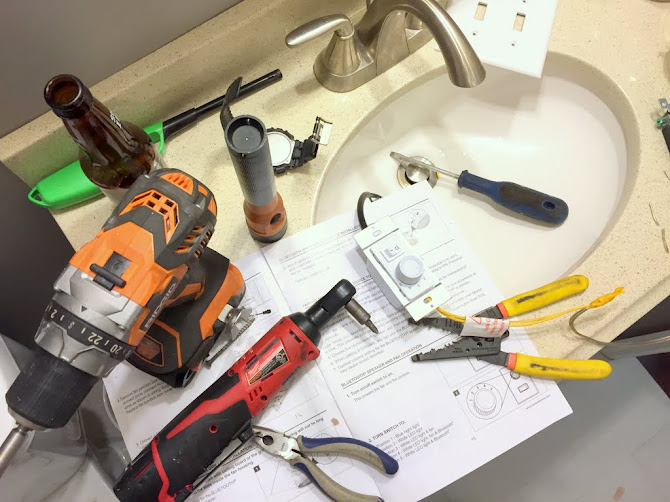
Beer and lighter inexplicably put onto the bathroom sink at some point before/during this project… apparently.
Another bit about the included instructions: a very crucial page is outdated. Even with the expertise I had helping me, we still had some issues getting the fan installed because the instructions in the box weren’t quite right. See this?
It should actually look like this, which I found on the Homewerks website (H/T also to Sawdust Girl). But the second we saw the new version, we both realized that it should have been a lot simpler to finish (and now you can avoid that same experience and just do it right the first time!).
So, you’d think that with all the drama I had to get it installed, I would have shrugged my shoulders and just said “Whelp, this was a completely failed DIY project.” And I was very close to thinking that. About 99%. Except then, the most beautiful thing happened: the friggin’ thing turned on, and this came out crystal clear:
Playing music in my bathroom… LIKE A BOSS.
Guys, you know I love a good aha moment, and prior to this beautiful noise, I thought I’d be emailing the nice folks at Homewerks back and telling them I wouldn’t be able to even look at this product without giving it the ol’ side-eye (because I don’t usually blog about things that make me tap my arsenal of swear words as it goes in… unless it’s really, really funny). But after I started playing around with it, I’m TOTALLY SOLD on this thing. It’s worth the trouble (and expense if you hire a pro) of installing. And I suppose I am just very, very forgiving when the end result is lots and lots of booty shaking.
One neat feature: the fan comes with a remote that lets me change the volume and track from the comfort of my bathtub (I placed this on the opposite wall from my shower nozzle to keep it dry).
I’ve found that the volume sometimes wants to be too helpful and thinks it’s the song forward button, though. Not really much of a problem since my phone is almost permanently attached to my hand, so I can control it that way too, but the sound quality is excellent and fills nearly every inch of this small house with sweet, sweet music.
The fan is much quieter than the old fan that was in here, and the added light is nice too. The wall switch has a dial that takes some getting used to (different positions combine the light, fan, Bluetooth & light, etc.), and there’s also a blue light option that adds a different mood to the room. I haven’t really used this setting yet since you can’t play Bluetooth with it, but I think that would be a good upgrade for future versions of this product (I’m picturing a couple’s bath scenario… or just someone who wants to pretend they’re in Blue Man Group #mybrainisweird).
Now that I’ve been using the “guest” bathroom for as long as I have, I discovered a few other projects I’d like to do to the room, one of which is adding some extra storage above the toilet for towels and baskets (I still love the vanity I put in, but the sink basin takes up a lot of space I would have otherwise used for makeup and cleaning products).
But here’s where we get to the fun part… the part where you guys tell me which song gets your blood pumping and qualifies you for winning this fan. Here are the giveaway rules:
Prize: One (1) HomeNetWerks Bluetooth Bath Fan with LED light and Speakers & $100 gift card to Home Depot (for supplies)
Number of winners: One (1)
Ships: U.S. only
To enter: Leave a comment with your favorite song that gets you in a booty-shaking kind of mood (or favorite song to sing along to in the shower), and then confirm your entry in the Rafflecopter widget in this post.
Giveaway ends: July 7, 11:59 PM
As usual, I’ll answer the question first (forgot to add that in yet!): Lately, my friends have been talking about doing a karaoke night, so I’ve been listening to Megan Trainor’s Title album to prepare (my voice is similar enough in range to be able to hit her notes)… “Dear Future Husband” and “Mr. Almost” are at the top of the list!
I am a big believer that you should never tackle a project unless it solves a problem. Seriously. I am lazy like that. And yes, sometimes the problem is that you are bored and your project fills that craving for creativity….unless you have four kids and then, you are probably thinking WHATEVER MY PROJECT IS A NAP.
Preach my friend. Preach. Naps are my version of a date night. Complete with Barry White music. (I almost typed Barry Manilow there….totally different vibe. Definitely not nap music.)
Okay….so if you recall, we constructed the beds for the boys a while back. Click here to read that old post. They were originally bunk beds that we found in the trash and needed some tweaking to make functional. The problem with bunk beds is that the headboard and the footboard are usually the same height. We even added “finials” to the headboard portion of the boys bed but as you can see below…their pillows could go right over the top of the headboard rail. I wanted a proper headboard so that they didn’t find themselves pushing against the window or falling off the end.
I figured that a 3/4″ thick piece of plywood would solve that problem. We bought one sheet of 4×8 plywood and decided on a simple design that we could add to the existing headboard to make it more ‘headboardy’. That is a legit word. It’s too legit to quit. yay. yay.
I started by measuring and marking the height and width I needed.
Then to make it a smidge more interesting than just square, I decided to do a round cut out on both corners. That was achieved by marking 10″ over and 10″ down from each corner….then I used a rounded pot to make the curve.
Cutting them out was super simple.
I wish I was better with the jigsaw. I think I might practice on some scraps and do some fun designs.
Anyhooo….I cut out the boards and then sanded them lightly.
Since this was plywood, it was important to use edge banding to make it look like a solid piece of wood. We have an old iron that we use for this type of thing but if you don’t have one, I would definitely suggest using a piece of parchment paper to protect your iron.
After the edge banding was on the exposed edges, I sanded them all down really well (that is the key to edge banding….a good sanding to blend it in) and prepped the boards for paint.
I wasn’t in the mood to repaint the entire beds so I decided that I would just use the same paint that I used for the rest of them to make the headboards look like they had been there all along.
The color is Hale Navy by Benjamin Moore.
Okay…so I had the paint can on the edge of my makeshift workspace….just like this….
And Weston walks over, moves the brush off and takes the entire paint can and dumps it on his chest. I’m not even kidding. It was like a game to him. He dumped it right smack dab in the center of his plaid overalls (it was a very cute outfit by the way) and it poured down his front into a giant puddle and he started smearing it around with his foot. Paint problems for the boys room = 2.
Next came installation. Since the existing headboards already had a brace across the back, we decided that the best way to attach the new headboards would be screwing them directly into the existing brace.
The boys had wrestle mania while daddy worked.
Poor LJ. Weston is constantly trying to sit on his head.
Jeremy used a couple dark screws and it was super simple.
They are low enough and dark enough that you can’t really see them at all unless you are really close.
Oh and I wanted to show you the edge banding all painted up. Looks good right!?
So here is the finished product. Totally high enough to act like a real headboard but looks like it’s been there all along because of the color and the round corner cut outs.
Oh and just so you can see what it looks like ‘in-use’….here is a picture of how high it looks when the pillows are in normal sleep mode….or when tummy time is in session
So there you have it…the new boys headboards. The best part is that if we change our minds or the boys want bunk beds down the line, we can remove the four screws and stack them back up. Easy peasy!